AIS Install


axapowell

Member
Hey Yacht owners, I am installing AIS this spring and have been acquiring all the necessary hardware and wiring.

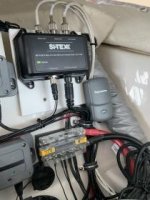
Decided to go with the RayMarine 700 Class B with the internal VHF antenna splitter for simplicity. It will work well with my SeaTalk Network and my RayMarine GS series equipment. I?ve got everything needed for the install including my FCC MMSI for international travel.

MaxMarine has already programmed the unit in advance, so all that is left is to plug it in and run the new GNSS gps antenna up to the hardtop.

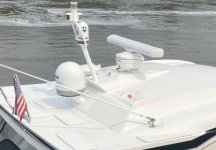
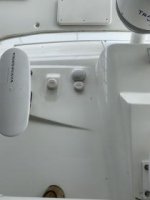
So, anyone added anything to the hard top? I?ve got the spot picked out and Formula has sent some info for access, looking for any advice.

Thanks,
Dave
 

Attachments

  • 60152AD9-BB4B-405A-861F-16C3F07BECF7.jpg
    60152AD9-BB4B-405A-861F-16C3F07BECF7.jpg
    18.5 KB · Views: 43
I need to do the same project over the winter so I will be looking forward to you showing me the way. That looks like the best spot for the antenna .
 
Have you started the installation ? If so how did it go? I'm trying to decide if I can do it myself or have it professionally installed.
 
My 45 is still in heated storage and we only get access twice over the winter, so no, I haven’t started the actual install yet. Planned launch date is for mid May and the AIS install is close to the top of my list, so as I get ready, I’ll post a DYI and photos for you.

Looks like it won’t be too difficult, access is the key!

Dave
 
Dave,

Man I feel for you I have already been out on my boat twice this month and have a planed 50 mile cruise this weekend.
 
Managed to complete the AIS install.

Access to the antenna mounting spot by removing the starboard side light panel. Take the light cover off first! One large philips head screw, you can see the difference for sure. Then there are two clips on forward and aft that will release. Carefully slide the panel out, there are two aluminum L brackets that hold it in too.

11B06820-E0B4-4578-B097-1C176CB6A88F.jpg

I mounted the antenna just forward of a Sirius Xm antenna because of the thickness of the hard top layup. You will be able to see that to from below.

3C73877D-1860-46DA-96D4-765F997231A1.jpg F144979E-0D83-47FA-BF19-E010D9DCCBAB.jpg

Remove arch speaker, side panel above the counter, access panel in the aft storage compartment, cockpit fridge/ ice maker, and the circuit breaker panel by the helm for wire routing access.

630573E3-29CB-47F1-AE1E-C8794F18FDDA.jpg F8F4496C-2B0E-4BE2-984F-15588568AC43.jpg 48DB6E38-9CDA-49AD-9E68-3F787B750BB4.jpg 6909F8D2-4B3F-4DA5-9075-97C8826D2183.jpg

I was able to fish the wire pretty easily, but a second set of hands will definitely help. Longest run was from the fridge to the circuit breaker panel and there are a lot of ducts in there to maneuver around if you have cockpit heat and air. I also recommend that you use a piece of blue painters tape on the antenna connector to protect it.

Carefully remove the large dash panel and protect the screens. I laid out a couple soft towels and just laid it on the dash for access behind the panel.

FA4E4666-316E-473A-9FF3-50A414961CD2.jpg 50D43945-E672-4076-A16E-A3C03A1362DD.jpg

There was no room left to mount the AIS box, so I chose to ty wrap it to the bundle. Not my first choice, but it is out of the way and secure. Wire connection are pretty straight forward. There are 2 ground wires needed, one for the antenna and one for the actual circuity, I went right to the main ground buss. I was able to power the unit from a fuse box just under the starboard side. I had 2 open spots. Pretty easy too. I will re-label the 4a fuse spot, for now I wrote on it with a sharpie.

FC4D397C-86E5-41ED-A5EC-EF3DEFA35E74.jpg

Continued on next post…
 
Cover on the fuse block.

A265810E-9304-431D-B3C2-15F65ECF062C.jpg

I was able to add another T to my network with a short jumper to connect the AIS box. Hard to see here, there were a couple things in the way. The last connection is the antenna from the radio, plugs in the box and a jumper back to the radio. It?s short, another reason to have the box close to the radio. Wished there was a good spot to mount it.

234ABA3A-7856-4C40-B1C9-838425E26627.jpg

Working behind the dash is very congested for sure. At power up, I got a green light from the AIS700. Good news, I couple targets showed up on my plotter after a while, but the weekend was ending and weather was coming in, so, next week I will see if I am getting my info out.

Shoot me any questions if needed!

Dave
 
Dave,

That is a great “how to” install outline for adding AIS. I was on the river last week and thinking it would be nice to “see” the barges around the bends before Radar picked them up.
 
I had AIS added to my 350CBR with Hardtop 1 year after I purchased the boat. The only challenge was how to get the additional AIS GPS puck up on to the hardtop since i had the stainless steel supports which were already plumb full of wires to the lights, speakers, VHF antenna, radar, TV antenna, etc. Plus we would have to go around the shure shade rams and we just couldn't get the AIS puck up onto the roof. We actually mounted it behind the dash inside where all the black boxes go since the GPS signal easily penetrate the plastic of the dash. I didn't want to have to add a puck next to the leather looking wrapped area. Since there is clear to the sky from the dash there, the puck worked great on the underside of that surface of the dash. Lastly, AIS was really helpful when I was out off the coast and fog would roll in. I had both the AIS and the Radar overlay on the MFD. And I liked that the security guys patrolling the bay at night could read my AIS output and know who I was. When cruising in between 4 active Navy bases in the bay, one can't be too cautious.
 
Just had my AIS installed this week. All systems are working as they should be.
 

Attachments

  • 4D3E48A8-B01C-431A-9D18-5AECD312702A.jpg
    4D3E48A8-B01C-431A-9D18-5AECD312702A.jpg
    6.1 KB · Views: 10
  • A67B2426-49DC-4A44-953F-4D751D569020.jpg
    A67B2426-49DC-4A44-953F-4D751D569020.jpg
    13.6 KB · Views: 12
Rwvw415: How do you like having the DPS? Do you use it and do you think it works good? I was considering adding it but it's hard to find any real world experience, plus it's expensive to add.
 
I really like the system and use it all the time . I find it very helpful when getting the boat ready to dock or when I just need to stop and manage something or when I am setting up for a anchorage. One time I was stuck below a dam waiting for a major storm to pass before the lock master would allow us in the chamber, as we had lighting all around us. Once we set the DPS the boat stayed in the exact same position with the same heading for over 45 minutes. Sometimes the engines tacked up to 3000 rpm to fight the wind and the current but we never moved or lost our heading in that storm . If I had not had the system I would have been worn out trying to fight the wind and current that day. So yes I think it is a very valuable system.
 
Back
Top