FormulaONE
New member
Hello everyone. I am writing this to share my experience with replacing the headliner on my 1999 41PC. A little back story to this, I just bought this boat in late September from a friend who had owned it for 15 years and the sagging headliner was the motivation for him to sell it and get something new. He began the project in the v berth by way of removing all of the ceiling panels and he bought 3 rolls of 1/4 inch foam backed vinyl. So I was fortunate to have already had the materials from him and also not having to disassemble the ceiling in the v berth.
After I purchased the boat I took the material and plywood panels that he had removed home and began the process of removing the old material and nasty black foam that had deteriorated causing the vinyl to sag. I found that the best method to remove the foam from the plywood was to use a paint scraper and then a stiff bristle cleaning brush with dish soap and water. After I scrapped and scrubbed all of the old foam off, I let the plywood air dry in the driveway and let it sit for 48 hours before I began to re upholster to ensure that the glue would stick properly and no moisture was left.
I have never re upholstered anything before so I found a ton of videos on YouTube in regards to replacing automotive headliners. I used the same process that I learned from watching those videos and found it to work very well. I chose to use 3M 38808 headliner adhesive and found that to be very easy to work with and once it cured it left a very strong bond which I am comfortable with.
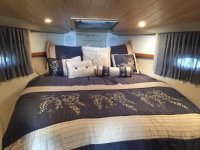
Here are some pictures of the v berth job


Almost finished. I just need to tighten up the side panels to close that gap.
After I finished the v berth I figured that I would take the main cabin area down to be re upholstered since the headliner was sagging pretty severely and starting to drop that nasty black stuff all over my beautiful carpet!!
Here are some before pictures.


I used the same method to wrap these panels as I did for the v berth. One thing that I did not have to deal with in the v berth was removing them and my god what a chore!!. With the help of a couple of buddies and a case of beer we got it done. There was one particular panel that I found to be very difficult to remove and that is the panel above the galley. I had to remove the microwave and both cabinet doors and it was getting hung up where it goes above the shower enclosure and also where it goes above where the refrigerator and tv is. We actually had to cut some wood out that is behind the tv in order to remove it. Had I known that cutting a small section of wood behind the tv would help, it would’ve saved me about 2 hours
Here are some pictures of the main cabin taken apart.


I also took the wall in the entry way out to be re upholstered as it was also sagging. For this I had to also remove the light switches and label them accordingly so I remembered how they went back together. Here are some pictures.
A picture of the wall in my garage:

Here are some pictures of the panels being prepped for re upholster and finished being wrapped.


After all the panels were wrapped, back to the boat they went to be installed. This time around after learning how tight the clearances are between the deck and walls I came armed with a couple inflatable pry bars which did the trick!. While the galley panel was still down I also replaced the starboard wiper motor as it was broken. Again though, I found my self struggling with the galley panel... I ended up scraping a couple parts of the galley panel but not enough to warrant again re upholstering it so I will live with it.
During the installation I also discovered how brittle the hatch trim rings are due to age. I posted that on Facebook on the Formula pc owners group page and almost immediately Scott from TAG reached out to me and I ordered both rings. These guys ROCK!! you cannot argue with how helpful these guys are.
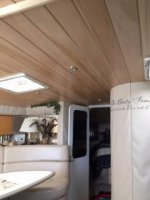
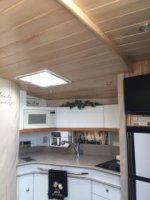
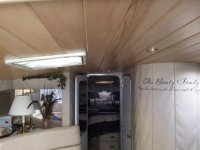
Here are some pictures of during the installation and the current state of this project and I am happy to report that it is almost complete. I will be going down tomorrow to install the hatch trim rings and replace my batteries to test all of the lights and begin cleaning.
Bottom line here is that although I wouldn’t say that it looks like it did back in 1999 but to save 12-15 grand it looks A LOT better than it did when I took ownership. This is entirely possible for most to DIY with patience and help from friends. I do not want to do this again but if anyone wants to pay me what it would cost to do than I’m all for it!! Haha only kidding.
I will report back after I finish installing the hatch trim rings and lights.
Sent from my iPhone using Tapatalk
After I purchased the boat I took the material and plywood panels that he had removed home and began the process of removing the old material and nasty black foam that had deteriorated causing the vinyl to sag. I found that the best method to remove the foam from the plywood was to use a paint scraper and then a stiff bristle cleaning brush with dish soap and water. After I scrapped and scrubbed all of the old foam off, I let the plywood air dry in the driveway and let it sit for 48 hours before I began to re upholster to ensure that the glue would stick properly and no moisture was left.
I have never re upholstered anything before so I found a ton of videos on YouTube in regards to replacing automotive headliners. I used the same process that I learned from watching those videos and found it to work very well. I chose to use 3M 38808 headliner adhesive and found that to be very easy to work with and once it cured it left a very strong bond which I am comfortable with.
Here are some pictures of the v berth job


Almost finished. I just need to tighten up the side panels to close that gap.
After I finished the v berth I figured that I would take the main cabin area down to be re upholstered since the headliner was sagging pretty severely and starting to drop that nasty black stuff all over my beautiful carpet!!
Here are some before pictures.


I used the same method to wrap these panels as I did for the v berth. One thing that I did not have to deal with in the v berth was removing them and my god what a chore!!. With the help of a couple of buddies and a case of beer we got it done. There was one particular panel that I found to be very difficult to remove and that is the panel above the galley. I had to remove the microwave and both cabinet doors and it was getting hung up where it goes above the shower enclosure and also where it goes above where the refrigerator and tv is. We actually had to cut some wood out that is behind the tv in order to remove it. Had I known that cutting a small section of wood behind the tv would help, it would’ve saved me about 2 hours
Here are some pictures of the main cabin taken apart.


I also took the wall in the entry way out to be re upholstered as it was also sagging. For this I had to also remove the light switches and label them accordingly so I remembered how they went back together. Here are some pictures.
A picture of the wall in my garage:

Here are some pictures of the panels being prepped for re upholster and finished being wrapped.


After all the panels were wrapped, back to the boat they went to be installed. This time around after learning how tight the clearances are between the deck and walls I came armed with a couple inflatable pry bars which did the trick!. While the galley panel was still down I also replaced the starboard wiper motor as it was broken. Again though, I found my self struggling with the galley panel... I ended up scraping a couple parts of the galley panel but not enough to warrant again re upholstering it so I will live with it.
During the installation I also discovered how brittle the hatch trim rings are due to age. I posted that on Facebook on the Formula pc owners group page and almost immediately Scott from TAG reached out to me and I ordered both rings. These guys ROCK!! you cannot argue with how helpful these guys are.
Here are some pictures of during the installation and the current state of this project and I am happy to report that it is almost complete. I will be going down tomorrow to install the hatch trim rings and replace my batteries to test all of the lights and begin cleaning.
Bottom line here is that although I wouldn’t say that it looks like it did back in 1999 but to save 12-15 grand it looks A LOT better than it did when I took ownership. This is entirely possible for most to DIY with patience and help from friends. I do not want to do this again but if anyone wants to pay me what it would cost to do than I’m all for it!! Haha only kidding.
I will report back after I finish installing the hatch trim rings and lights.
Sent from my iPhone using Tapatalk
