
axapowell
Member
Hey all,
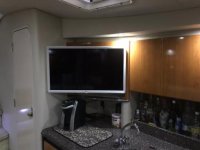
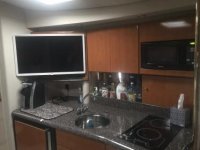
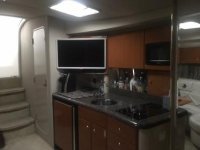
Thought I’d share a simple and clean TV update in my 37PC.
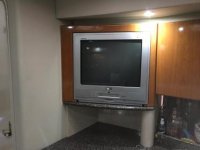
The old RCA was still doing its job, but occasionally the sound wouldn’t work unless you cycled the power a few times, figured it was time to remove the additional weight and move on...
I picked out a LG 32” LED Smart TV, 32LK610BPUA. https://www.amazon.com/gp/product/B079V3HSLQ/ref=ppx_yo_dt_b_asin_title_o03_s00?ie=UTF8&psc=1
And just in case you need to know, it does fit nicely in the baggage compartment of a Piper Arrow II, along with in flight beverage service and the rest of our gear for the weekend. (see the pic!)
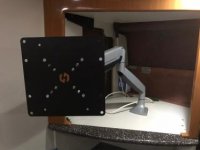
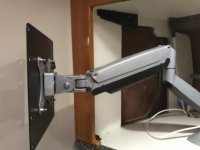
The mount is a computer desk mount that articulates in nearly any angle or position possible. It is gas piston assisted and seems to work well.
https://www.amazon.com/gp/product/B07CHMDJQP/ref=ppx_yo_dt_b_asin_title_o02_s00?ie=UTF8&psc=1
You will need a VESA adaptor for this install.
https://www.amazon.com/gp/product/B07771JFVP/ref=ppx_yo_dt_b_asin_title_o02_s00?ie=UTF8&psc=1
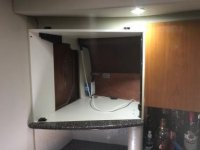
So removal is pretty straight forward. Formula has a unique way of holding in the enormous weight of the old RCA. First, remove the trim from the bottom up. Clips, no screws, be careful, there’s not much there. Next, look for the black wedges on either side of the front of the TV. Remove a screw from each side, gently lift the front of the TV and a little slide forward to release the jig-saw puzzle piece in the back and out it will come.
The arm mount is a single hole carriage bolt with a hand screw and backing plate for under the counter. I tested the hole size prior to drilling as I wanted a snug fit. Leave the white ty-wrap on during the install, it makes it much easier to manipulate the arm and will avoid injury to yourself. I measured a couple times and got the mount as far back in the opening as I could, but also allowing enough room to tighten the base hand screw. After it was in and tight, I marked the excess screw, removed it and cut it off and reinstalled.
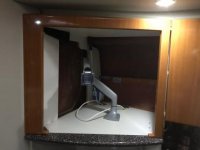
The mount for the TV is then attached to the adapter plate and is a slide in to the arm. I was able to put this together and then slide the mount, plate and TV onto the arm. At first, the piston will not hold the weight. There is an adjustment for this, read the instructions. Counter clockwise for more tension!
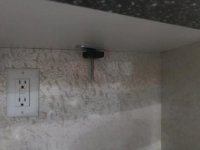
Cable and power aren’t an issue, but I am going to fish a new cable wire from under the sink for added length and additional movement.
A few notes. The swivel for horizontal is a little, call it loose. There is no adjustment for that, but it seems okay at the dock. If you take the TV off to travel in rough water, that’s a good idea, but watch out for that Arm, lots of pressure, need to find a way to avoid it extending and doing damage. Might be able to reuse the ty-wrap again! The TV is white, wasn’t sure at first, but quickly grew on me, like it.
All in all, pretty happy with the install. Over the summer, I’m going to plan on adding additional liquor storage on the right side of the mount and have the Formula cabinet maker do a custom trim and door behind the TV. And a filler or enclosure to hide the innards. Still weighing out the options!
Here are a couple pics.
Dave
Thought I’d share a simple and clean TV update in my 37PC.
The old RCA was still doing its job, but occasionally the sound wouldn’t work unless you cycled the power a few times, figured it was time to remove the additional weight and move on...
I picked out a LG 32” LED Smart TV, 32LK610BPUA. https://www.amazon.com/gp/product/B079V3HSLQ/ref=ppx_yo_dt_b_asin_title_o03_s00?ie=UTF8&psc=1
And just in case you need to know, it does fit nicely in the baggage compartment of a Piper Arrow II, along with in flight beverage service and the rest of our gear for the weekend. (see the pic!)
The mount is a computer desk mount that articulates in nearly any angle or position possible. It is gas piston assisted and seems to work well.
https://www.amazon.com/gp/product/B07CHMDJQP/ref=ppx_yo_dt_b_asin_title_o02_s00?ie=UTF8&psc=1
You will need a VESA adaptor for this install.
https://www.amazon.com/gp/product/B07771JFVP/ref=ppx_yo_dt_b_asin_title_o02_s00?ie=UTF8&psc=1
So removal is pretty straight forward. Formula has a unique way of holding in the enormous weight of the old RCA. First, remove the trim from the bottom up. Clips, no screws, be careful, there’s not much there. Next, look for the black wedges on either side of the front of the TV. Remove a screw from each side, gently lift the front of the TV and a little slide forward to release the jig-saw puzzle piece in the back and out it will come.
The arm mount is a single hole carriage bolt with a hand screw and backing plate for under the counter. I tested the hole size prior to drilling as I wanted a snug fit. Leave the white ty-wrap on during the install, it makes it much easier to manipulate the arm and will avoid injury to yourself. I measured a couple times and got the mount as far back in the opening as I could, but also allowing enough room to tighten the base hand screw. After it was in and tight, I marked the excess screw, removed it and cut it off and reinstalled.
The mount for the TV is then attached to the adapter plate and is a slide in to the arm. I was able to put this together and then slide the mount, plate and TV onto the arm. At first, the piston will not hold the weight. There is an adjustment for this, read the instructions. Counter clockwise for more tension!
Cable and power aren’t an issue, but I am going to fish a new cable wire from under the sink for added length and additional movement.
A few notes. The swivel for horizontal is a little, call it loose. There is no adjustment for that, but it seems okay at the dock. If you take the TV off to travel in rough water, that’s a good idea, but watch out for that Arm, lots of pressure, need to find a way to avoid it extending and doing damage. Might be able to reuse the ty-wrap again! The TV is white, wasn’t sure at first, but quickly grew on me, like it.
All in all, pretty happy with the install. Over the summer, I’m going to plan on adding additional liquor storage on the right side of the mount and have the Formula cabinet maker do a custom trim and door behind the TV. And a filler or enclosure to hide the innards. Still weighing out the options!
Here are a couple pics.
Dave
Attachments
-
 A3EA0AEE-5B3A-4567-927F-AEE0351D6846.jpg16.5 KB · Views: 53
 -
 E3243088-4E4B-4DD1-8CC0-F18DDF9210F8.jpg11.5 KB · Views: 60
 -
 5BDB3F4D-B5AC-4052-954B-D00D72D295A8.jpg11.5 KB · Views: 54
 -
 F60AC105-AB3B-483F-B26A-D952D934981A.jpg11.6 KB · Views: 53
 -
 2D654AC0-6B17-4372-B846-B36349DD636C.jpg9.3 KB · Views: 53
 -
 4F47DE54-F0F6-414F-BED4-6918E07DB331.jpg11.3 KB · Views: 50
 -
 A8EB3F53-5D9C-4EA3-A958-C1238BAD9735.jpg12.6 KB · Views: 52
 -
 C0535DCB-43F3-4BED-8D89-170A5D53F641.jpg12.8 KB · Views: 51
 -
 683C029B-85F9-4079-A62F-9B14F0CB617C.jpg14.4 KB · Views: 51
 -
 3D009510-3432-45DD-9A84-77E0896BF93E.jpg12.3 KB · Views: 52
