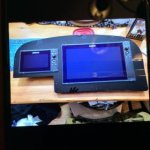
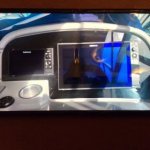
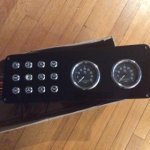
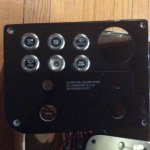
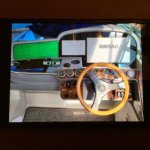
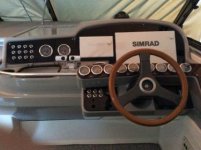
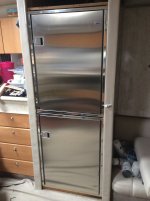
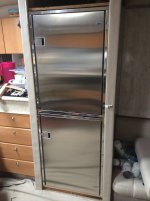
Winter Projects


formula40pc

Member
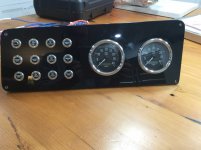
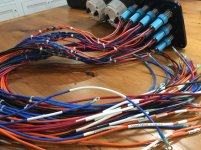
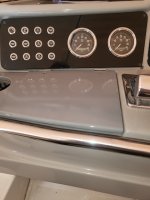
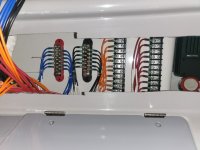
Started a few winter projects on my 2002 41 pc. Removed all original electronics which meant new dash panels. Panels are being made by ?Boatoutfitters? in Fl. Should be done in couple of weeks. Will post pics later. Changed rocker switches to push button switches. Removed cockpit fridge and replaced with drawer fridge. ( hated drinks rolling around when opening door underway) Removed galley fridge which had a cracked bottom and every 2 weeks the frost from freezer would push door open. Several other projects like replacing shower head with rain shower head and handheld. Will try and post a couple pics of mock-up.6BF4588B-74B1-4ED1-95D4-3E4F56563F7F.jpg733F79FA-2537-415B-ABD9-651C15675ABA.jpgB761AF01-9193-4C43-8643-E08934EE49AB.jpg0AF248A9-A0F9-4213-9520-0E85C87B49D8.jpg6F4ECE65-1CA2-4BF6-BC19-2F5C7AA0FE97.jpg
 
I replaced all the electronics last winter. Contacted Formula and they gave me a contact for new dash panels. They are 1/8” aluminum painted gray. They cut out for all the flush mounted electronics. They fit perfectly and matched the gray of the other dash panels.
 
I may be into more trouble then staying out of trouble:rolleyes:
Couple other projects I didn?t list, all new check valves, ball valves, strainers and hoses for A/C intakes and new electronic engine/trans controls. Single lever for each engine. Stock Volvo 4 levers are not reliable as most already know. Couple pics of main dash in progress with plotters mounted and new cockpit drawer fridge. Just made template for new acrylic panel for right side of fridge with electric box.
 

Attachments

  • 8BAD3D9A-13C9-4302-BB38-9108F1333707.jpg
    8BAD3D9A-13C9-4302-BB38-9108F1333707.jpg
    15 KB · Views: 87
  • E7DB3DC7-D282-41D0-A5A6-6804F35A8F42.jpg
    E7DB3DC7-D282-41D0-A5A6-6804F35A8F42.jpg
    13.5 KB · Views: 88
  • 4DD37416-8795-4257-9613-3A4F549F128D.jpg
    4DD37416-8795-4257-9613-3A4F549F128D.jpg
    16 KB · Views: 80
  • 55658882-769C-4E3C-9277-D70EB909C723.jpg
    55658882-769C-4E3C-9277-D70EB909C723.jpg
    12.6 KB · Views: 79
  • 9A67E53D-9116-4242-B101-7C43B4510EA0.jpg
    9A67E53D-9116-4242-B101-7C43B4510EA0.jpg
    13.8 KB · Views: 88
Just received 3 more pieces of dash panels. One to the left of the MFD panel and the two lower panels, each side of steering wheel. Will do gauges, trim tabs gauges/switches and engine controls once I confirm new shifter control unit. Attached are a couple pics of new panels with new push button switches and new tachometer?s mounted. Will mount on boat in couple of weeks.
 

Attachments

  • 036C0EA7-C781-43E1-879C-EB49DDDE8AAF.jpg
    036C0EA7-C781-43E1-879C-EB49DDDE8AAF.jpg
    12.2 KB · Views: 47
  • BF1B539F-0DE5-40E7-9EB1-25B3FF1E06AA.jpg
    BF1B539F-0DE5-40E7-9EB1-25B3FF1E06AA.jpg
    10.9 KB · Views: 46
  • CB395FBF-9750-4F93-B060-5B59D2A4F286.jpg
    CB395FBF-9750-4F93-B060-5B59D2A4F286.jpg
    13.8 KB · Views: 45
Thank you, I am using the Bluewater 19mm pushbutton switches. I like the removable wiring harness , if a switch goes bad unscrew the nearness and put in new switch. The identification labels are easily removed also. Do you have a 41 pc? If so I can post my panel layout with dimensions. I hope to stop at boat tomorrow and put panels in place. Will post pics
 
Went to boat today and installed new panels. Had to cut out fiberglass sub panel to allow for clearance on the relocated buttons and tachometers.
 

Attachments

  • 11A1CB18-9F88-4A1E-8615-881D2BB7F87A.jpg
    11A1CB18-9F88-4A1E-8615-881D2BB7F87A.jpg
    17.7 KB · Views: 44
Thank you. The smaller plotter will be used for gauge display as I bought the “Yacht Device” adapters to transition the engines communication to nmea 2000. I left the gauges as a backup in case I want to use for something else. Once I change engine / trans controls over to Glendenning I will change the last panel . Just received new fridge and freezer for galley will work on that next.
 
Started on reframing for new fridge and freezer. Installing separate Isotherm units. Wanted to buy combi Line unit but no one had it or a delivery date, so I bought the units separate and will rework existing cabinet opening to accept units. Will take pics this weekend.
 
Finally got galley cabinet reworked for new fridge and freezer . Wanted the new Combi unit Isotherm came out with but was unavailable so I bought separate units and built a shelf between them. Going to build a caBinet above for more storage and mount TV on the cabinet door. Will be working on wiring new dash panel buttons and electronics
 

Attachments

  • 7F4B3B8B-0D55-4BEA-A1C4-5353A571A4DB.jpeg
    7F4B3B8B-0D55-4BEA-A1C4-5353A571A4DB.jpeg
    644.3 KB · Views: 26
  • 6476BA44-EF3A-492A-A82E-0C251323CC02.jpeg
    6476BA44-EF3A-492A-A82E-0C251323CC02.jpeg
    657.4 KB · Views: 25
Got my Label maker to make heat shrink labels for all new switch wiring. Dash with push buttons will be all labeled and ready to install next weekend. All wires are going to terminal blocks, Much easier than butt connecting for future . Now I wont have to cut and reconnect. Just unscrew from terminal block. More work now but easier in the long run.
 

Attachments

  • 9F88FF4A-8CEE-4EBC-BA1A-35F7A85B4EAE.jpeg
    9F88FF4A-8CEE-4EBC-BA1A-35F7A85B4EAE.jpeg
    82.8 KB · Views: 22
  • D5E250D5-6654-428E-B207-BD2F64884918.jpeg
    D5E250D5-6654-428E-B207-BD2F64884918.jpeg
    128.6 KB · Views: 22
Excellent work. As someone who’s spent a lot of time behind the dash, this will most definitely be time well spent when it’s time to dig back in.
I really like the way Sabre/Back Cove’s entire helm is a hinged pod that swings forward providing access to everything at once - without pulling individual panels. Their aesthetics are seamless and you’d never know the whole thing swung out but for the locking lever latch on the pod bulkhead. They are also very good at labeling all harnesses and wiring.
You certainly give them a run for their money!
Great progress.
Thanks for sharing.
 
Last edited:
Update on dash. Went to boat and wired panel push button switches to terminal blocks. Left block Blue wires are all the switch and panel lights. 2nd block black wires are all the grounds from switches, 3rd block is power in to switches which will be from breakers ( hopefully do that tomorrow), 4th block is power out from switches to components Radar, VHF, MFD Pumps etc. (hopefully get that done tomorrow as well.)
 

Attachments

  • A76B81A2-AE82-4E19-9A02-CE48AE45E3BB.jpeg
    A76B81A2-AE82-4E19-9A02-CE48AE45E3BB.jpeg
    69.3 KB · Views: 25
  • 9A5AF2E6-C9F3-4D77-BF2A-79222A68E0B9.jpeg
    9A5AF2E6-C9F3-4D77-BF2A-79222A68E0B9.jpeg
    76.1 KB · Views: 28
  • 4C427FF3-5D9D-43A4-9E77-47D50AF0303F.jpeg
    4C427FF3-5D9D-43A4-9E77-47D50AF0303F.jpeg
    128.6 KB · Views: 24
Back
Top